Friday, August 19, 2011

Zucchini Chips

Summer is coming to a close - but many of my dear friends with gardens have zucchini and summer squash coming out their ears. Here was one of my favorite ways to eat it (and preserve it!)

 Zucchini chips! 

It is truly amazing how many cukes you have to use to fill a small jar of these. 

So - here is how.

Wash and slice summer squash as thinly as you can. I did about a 1/4" thick. A mandolin could come in handy for this, if you fancy those.

Then arrange on your dehydrator sheet - or a parchment paper line pan if you dry them in the oven.


Sprinkle with a little salt. Set the dehydrator for 120º or  the lowest temp for your oven. These dry fairly quickly, depending on how thin they are sliced and the air flow. You may need to flip them if drying in the oven. Then wait 6-8 hours or overnight. These don't really become "overdone" unless the oven is too hot.

Once dry and crispy, carefully remove from sheet and store. They are very brittle - and very addictive!
And for reference, this is a pint size jar. It contains 3 large summer squashes. They really shrink a lot!

Sunday, July 31, 2011

Keeping costs down and nutrients high?

Cutting the cheap fillers (starches!) when going on GAPS can send your budget soaring. While upping the fat and cutting the nuts and pricey veggies are my biggest tips - Nourished and Nurtured has put together a great post with more ideas!

Thursday, July 21, 2011

GAPS intro looking too overwhelming?

Check out a GAPS Intro Book! Cara gives you a fantastic guide to help you make your way through the challenges of intro and takes care of the planning for you.

You may have looked at the list of "do not's" and thought "What can I eat now?" .... And she answers that question with lots of delightful recipes. An e-book you can click and print, check it out!

Monday, June 27, 2011

Pink lentils & Salmon

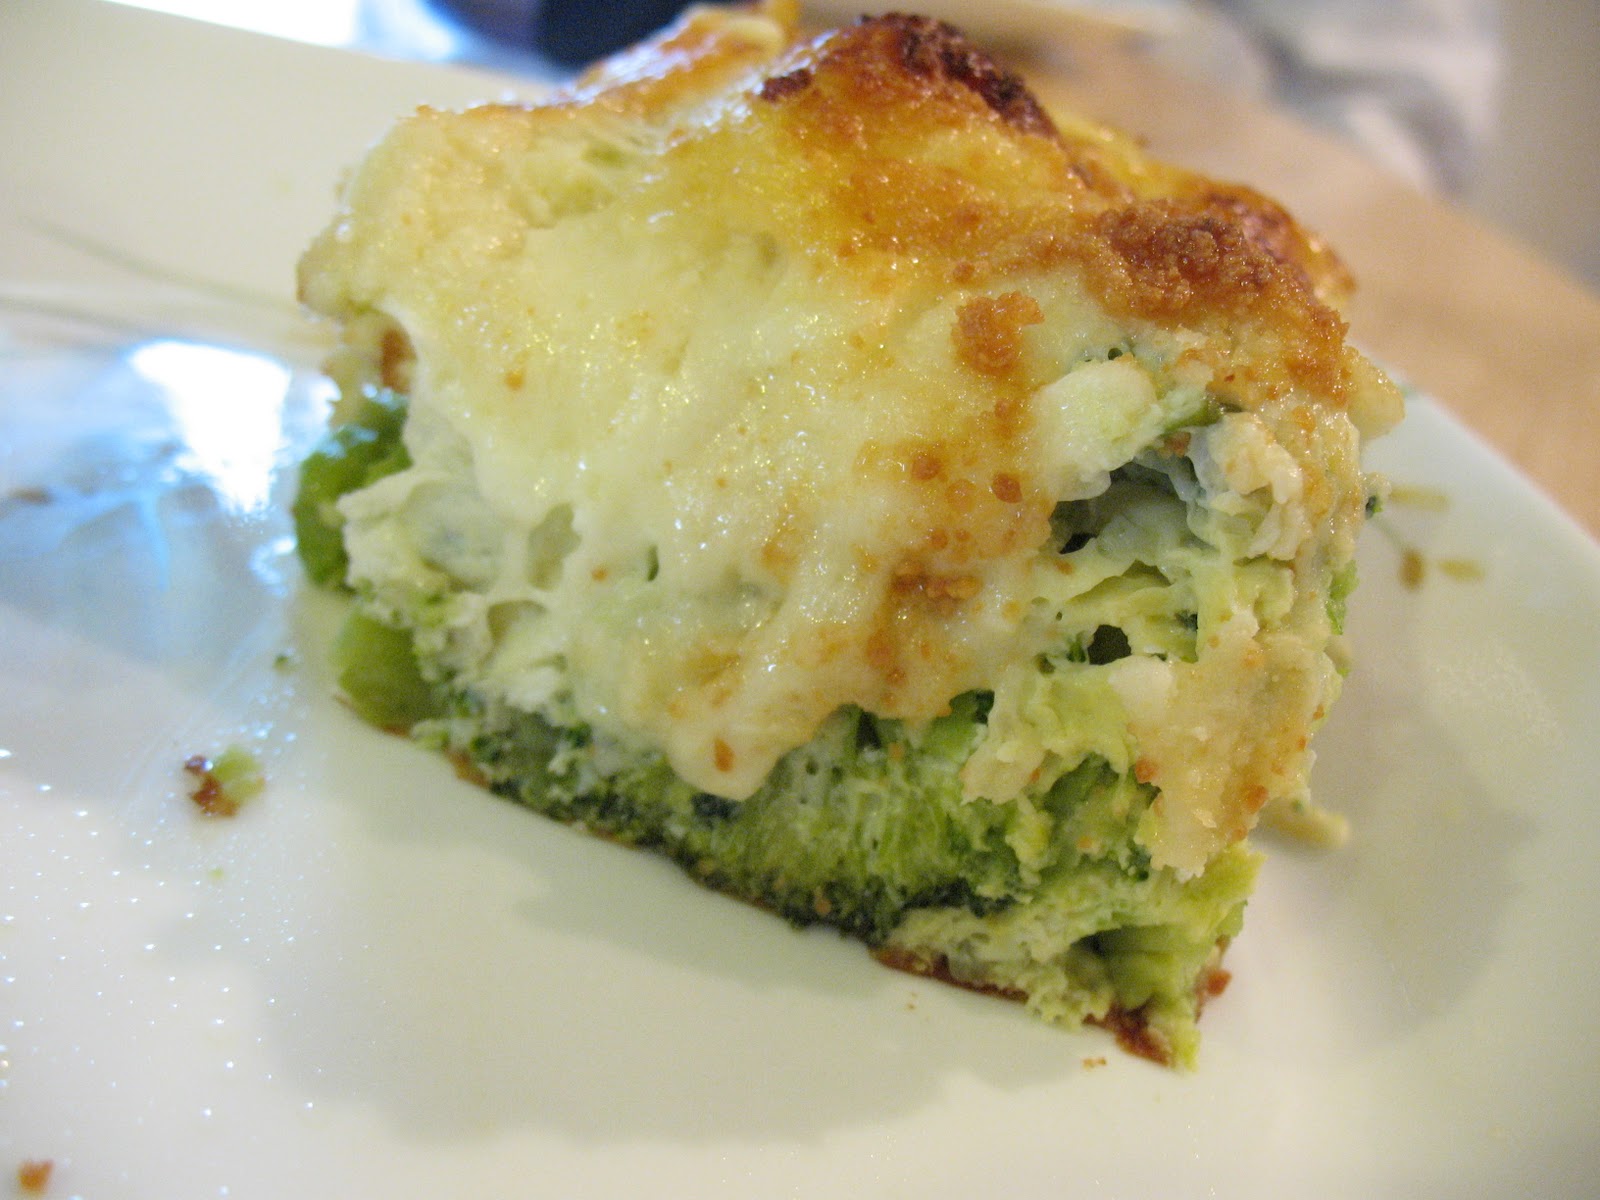
This meal satisfies all the requirements for a good recipe these days. Fairly quick to prepare, nutrient dense, tastes good warm and cold, and nutrient dense. I've packed it up for several lunches this week, as the texture/flavor is similar to potato salad. Just call it salmon lentil salad, and everyone will tell you how amazing you are. If you serve it warm, call it casserole. No one will notice.


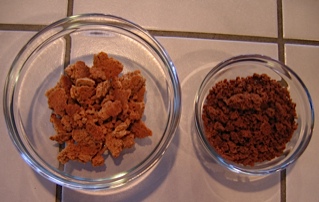
    2 heaping cups lentils
    3 cups dense flavorful broth (chicken or fish)
    1/4 cup lard
    1 lb salmon
    cheese - such as parmesan, dill garlic cheddar, romano, etc.
    1/3 c yogurt
    1 large or 2 small onions

    1/2 tsp salt
    pinch cayenne
    1/2 tsp mustard
   generous amount of dill
    1/2 tsp curry powder
    generous paprika

Soak lentils overnight in filtered water. The water should be double the height of the lentils, as they will triple in volume. Put salmon in the fridge to thaw overnight, if frozen. If you really plan ahead, you can sprout the lentils for a day or so. If you're running last minute, you can do a quick soak with the lentils, and thaw the fish in a bowl of warm water.

Next day, cook lentils in the chicken broth on high-simmer for about a half hour, stirring often. Once they have changed color, they are done. Add lard and salt, and turn off.

While lentils are cooking, mix yogurt with other spices and place salmon on a greased pan. I baked the salmon in the oven, but you could also cook it even faster in a skillet. Cover the salmon with the spiced yogurt, and cook gently. In the oven, 350º for about a half hour, on the stove, medium - low heat for about 5-10 minutes, depending on the thickness of the fish. Either way, check the salmon regularly, fish should break apart with a fork, but should not be overcooked. It will continue to cook a little more after heat is turned off.

Cook onions in a separate pan, with plenty of grease, until cooked through and lightly browned. Add to lentils. If conserving dishes, cook them before the fish, and you can use the same pan to cook the fish in.

Break apart salmon and add yogurt salmon mixture to lentils, along with cheese. Add additional salt and seasonings to taste.

Quick, delicious, and loaded with nutrients!

Wednesday, June 22, 2011

Banana leather

Walked into the store and they were begging me to take away bags upon bags of spotted bananas. Bananas are one fruit I don't feel quite as bad about buying conventional, as the thick skins that absorb the chemicals and pesticides are peeled away, but if I could get everything organic, I would get organic bananas too, at least for the sake of the growers. Walking out of the store with two huge bags of spotty bananas was a treat I didn't want to pass up, even if I'm not making banana bread. So home they came.

My daughter helped mash them as I peeled and drop them into the bowl.

Then I spread them on a piece of parchment paper, laid on a pan, and put them in my 200 degree oven for several hours. I was drying several other things in the oven anyway.

At that point, they had browned some and looked lovely, but weren't dry enough. So down into the dehydrator at 135º overnight.


And in the morning I had this:


Chewy, densely sweet, and ready and waiting should I want to add to smoothies or baked treats (as a sweetener!) or just for a banana-y treat. 

Friday, June 17, 2011

GAPS Breakfast Cereal!


Nuts are not something to eat in tremendously large quantities, but if you want a GAPS legal, grain-look alike treat check out grain-free cold breakfast cereal!

Tuesday, April 26, 2011

Variations on a Theme (i.e. Eating the same thing all week and it not getting boring!)

Themed weeks are nice, because half the meal is already prepared, and I just add a little somethign to make it different. This week the theme was ham and mustard. Ham is not technically GAPS legal, unless you cure it yourself, but we are not being extremely strict at the moment. You could probably use any sausage or bacon or a pork roast...

So on the first day we had Ham, cubed, cooked, most set aside, and some mixed with eggs and cheese and mustard greens and my ruined BBQ sauce that is mostly mustard now. As a good foodie blogger, I should really share my failures more. Adding strong dijon mustard instead of dry mustard to almost perfect BBQ sauce is not a brilliant thing to do. That is, unless you have recipes that call for BBQ flavored mustard. So turn your tastebuds on : Ham, BBQ flavored mustard, melty cheddar cheese, eggs, and just a little greens that add some spice and otherwise soak up the other flavors. Yum...

Then this became a salad. All the same ingredients, but more kick of mustard greens (raw now, instead of cooked) and a lighter dish.

Now exceptionally mushy navy beans are added. Cooked in pork broth with lots of fat. Cubed ham, BBQ flavored mustard, greens tossed in and warmed a little, cheese.... Now it has become a casserole.

With grains, I could put this in a puff pastry, or a tortilla, or layer slices of ham and greens and cheese as a sandwhich.... You get the idea.


Do you ever eat the same thing all week?

Wednesday, April 20, 2011

Fermented Cod Liver Oil Giveaway!

If you aren't taking cod liver oil for it's fantastic vit. A, D, and essential fatty acids... Why aren't you?

Keeper of the Home is doing a giveaway so you can try it for free!

Green Pastures is the best brand around, and even if the regular flavor is something your turn up your nose at, they have lots of blends to make it easier to take every day.

Tuesday, April 19, 2011

Spanish Carrot Stew

4 c beef stock
1/2 lb gr. beef
1 lb navy beans
1 lb carrots (organic, preferrably)
2 gigantic onions
1/2 bulb garlic
2 tsp salt
juice of 1 lime
1 Tbsp cumin
1 tsp thyme
handful of crumbled cilantro
1 Tbsp hot sauce (give or take)
or some dried hot peppers, finely chopped


Would also appreciate the addition of:
bell peppers
tomato chunks
green onion
lettuce or bitter greens

Soak beans overnight with filtered water and a little baking soda. When ready to cook, drain beans of soaking water, and put in pot with stock. Cover with additional water so they have an additional inch of liquid, and turn fire on med-high so they can simmer for 3 hours. You will probably turn the fire down once they come to a hard simmer, you want it to be more gentle.

Peel and slice carrots, and add to beans. Then chop onions and garlic and stir in. The beans will need more frequent stirring at this point, as they will start to disintegrate and stick.

In a separate pan, cook the ground beef, and add, along with juice, to the stew. Then add the rest of your seasonings, and any other veggies that look appealing. Make it as hot or as mild as you like.

Top with some yummy yogurt, cheese, fresh avocado, and fermented salsa.

This is a great dish for picnics, too. It's a little different from the standard chili, taste great on a hot day, and stays warm for a long long time in the pot.

Tuesday, April 12, 2011

The more ideal Food pyramid

I do applaud the government for trying to give us some guidance on how to best feed our bodies... the only problem is, we've been trying to follow it and getting more sick.

How about trying this food pyramid on for size?


I know some of us GAPSters are ignoring the grains (and maybe the fruit as well!) in this pyramid for right now, but just think if you had always eaten this way and if your parents and their parents always ate this way?

Friday, April 1, 2011

What We've Been Eatin' lately...

I completely neglected to ever post our February menu, but here is March and February together.

February:

Week 1    Pink soup - Turkey Hash  -  Naked Bean Burritos  -  Fish Chowder  -  BBQ Ham Quiche

Week 2  Chicken & Squash Fries  -  Chicken Lentil Stew  -  Tom Goulash & Roasted Cauliflower  -  Sausage Lentil stew (upgraded leftovers)  -  Lemon Salmon Stir Fry with Egg Drop Soup

Week 3  Roasted Cauliflower, Steak, Salad   -  Broccoli Beef Quiche  -  Salisbury Steak w/ mushrooms and broccoli  -  Navy Bean stew  -  Braised Rainbow Cabbage and hot dogs (good ones!)

Week  4  Roast Chicken and Fried Kale  -  Mushroom Chicken Curry  -  Crock Pot Roast and Veggies  -  Taco Bowls  - Sausage Brusells


Week 5  Stew - Cheesy Crepes - Ginger Glazed Mahi Mahi

March:

Week 1 Bacon wrapped liver and Squash Fries  -  Mexican Pork and Liver salad  -  Italian Soup w/ sprouted lentils  - Shrimp Fried Cauli-rice w/ lentil stir fry  - Brussells Aug Ratin

Week 2  Banana Crepes & Suasage  -  Navy Bean Stew  -  Burgers w/ Garlic Green Beans  -  Tomato Onion Soup with Cheese

Week 3  Steak and Garlic Lemon Broccoli  -  Grain-free Pizza  -  Sausage Lentil Stew  -  Salisbury Steak w/ cabbage  -  Broccoli Cheese Quiche with liversausage   -  Seafood soup   - 


Week 4  Green Bean Turkey Casserole   -  Green Beef Curry  -  Naked Bean Burritos  -  BBQ shrimp w/ garlic fried green beans and turnip fries


Week 5 Mexican Carrot stew  -  pizza quiche


As you can see - everything tastes good with salsa, a chicken can last for several days, and we eat lots of leftovers. Not all of these have recipes posted here, but I hope they're food for thought!

Saturday, March 26, 2011

Basic Broccoli Quiche

Just a simple, delicious, easy meal. 

1 large head broccolli
1 lb cheese - I used a mix of romano, parmesan, and provel.
9 eggs
1/2 tsp salt

lard to grease pan.

So easy!
Steam broccoli (I find it easiest to leave the crown whole, and steam, stem down, then chop afterwards.) Broccoli should have just changed colors, don't overcook.
Use some lard and grease a 9" pan with your fingers.
Chop broccoli and cover bottom of pan.
Beat eggs and pour on top.
layer cheese on top.
Bake at 400º for 40 minutes, or until you can't stand the aroma anymore and take it out.
Cool for 10 minutes.
Cut into squares.
Dish up and enjoy!

Raw Chocolate Cheesecake


To my SAD-eating friend who begged for the recipe. :)

  4-6 oz unsweetened chocolate - melted
    1/4 c cocoa powder
    1/16 stevia & 1/2 c honey (OR 1 full cup honey) Taste if needed more sweetening
    1/2 c fat (Butter, coconut oil or palm shortening)
    1/2 tsp salt (if not using butter)
    1/2 tsp vanilla
    2 c yogurt cheese
(After making yogurt, drain about 4 cups through a fine cheesecloth overnight to get about 2 cups yogurt cheese.)

Melt chocolate and fat in a double boiler, add cocoa and sweeteners when chocolate is just beginning to melt. Remove from heat, allow to cool for a few minutes while you make crust.

Crust:
    1/2 c fat (such as coconut oil or palm shortening, you want it very solid when cold.)
    1/2 tsp salt
    1/2 c almond flour
    1/8 c cocoa powder
    pinch stevia OR dash honey

Mix all ingredients over double boiler until thoroughly mixed. Should be clumpy, but all the fat should be melted and mixed into flours. Press into the bottom of 8 in. pan. It will be a very thin crust, you can double this for a thicker crust, I just wanted a delivery device.

After crust is finished, fold yogurt into chocolate mixture. There is no need to have it mixed perfectly. Pour and spread into prepared pan and put in the fridge to cool for several hours.

A drizzle of chocolate sauce and whip cream would be divine on this... but we ate it too fast to find out.

It's Not Soup Navy Bean Casserole


The end of the month sometimes brings on re-newed creativity. Especially on months when a grocery expense was somehow missed, and I can't go to Trader Joe's until April. And I've not been thinking about food much anyway because I'm designing a new house. And the weather was warm (for a few days, before snowing.) According to my monthly planner, it was time to have beans. But not naked bean burritos because who puts green beans in tacos?

Ingredients:
1 lb fresh green beans, broken into bite-sized pieces.
the little bit of leftover ground beef out of the fridge (or other meat)
1 lb navy beans, soaked in baking soda and water
2 tsp salt
2-3 cups beef or chicken stock
onions and garlic, if you have any.
Lard, tallow, whatever fat is available. About 1/2 c or more. 

After soaking beans overnight, (or as long as you have time for) drain off water and put in a large stock pot along with stock and enough water to more than cover. Bring to a simmer, skim off foam, don't let it boil over, and simmer hard for an hour, stirring often so you aren't screaming when you try to clean the pot later. The beans will become even more mushy as they cool. Add salt, seasoning as desired, lots of fat, and mix in anything else that looks appetizing from the fridge.

While the beans are cooking, trim and wash green beans (or as some call them, string beans.) and steam gently until they have just changed color. Salt, add fat.

Re-warm other meat and veggies in toaster over/oven and mix all these items together. Plop on plates and pull out every condiment in the house.

My hubby had his with yogurt and salsa, I just added extra cumin and green onions. You could add any number of things. Hurray for lack of supplies!

Fish Stock isn't so fishy...

I've put off making fish stock for a long long time. Fish doesn't top the charts of my favorite flavors in the least. Usually only the mildest flavored fish can be found in my dishes. So making something really fishy? That looks at me? And not knowing a good source for fish heads... Well, it was a challenge I could happily ignore. I dutifully saved the recipe in my file (which is oh so basic!) and thought nothing more, until I met someone who works for a fish shop - and can get me free fish heads.
Then the fish heads sat in my freezer. They would look at me as I dug for my beef bones and ground pork, but it wasn't until I learned that even beef stock isn't allowed on lenten fast days, that I finally took the plunge. And guess what, fish stock isn't so bad. It tastes quite good - the flavor is different, but I enjoyed it. Only downside is that the house does smell like fish for the 18hours that you are simmering it. Not a bad smell, if you like fish, but not quite what I hope to walk into when I come home. Chicken stock or beef stock simmering is such an inviting smell... but fish? Well, it was worth it anyway. Once done, I drained the stock, picked out mushy stuff and threw it into my soup.  The heads disintegrate while they cook, so I only recognized little white balls as they eyes, hurray!

As for the recipe, I refer you to The Healthy Home Economist. The text of her recipe is below:


Ingredients

3 quarts of filtered water
2 lbs of fish heads and bones (fish heads alone will suffice)*
1/4 cup raw, organic apple cider vinegar
Himalayan or Celtic sea salt to taste

*Do not use oily fish such as salmon for fish stock or you will stink up the whole house!   Only use non-oily fish such as sole, turbot, rockfish or, my favorite, snapper.   I've also used grouper in a pinch, but the stock does not taste nearly as good.


Instructions

Place water and fish heads/bones in a 4 quart stockpot.   Stir in vinegar while bringing the water to a gentle boil.   As the water first begins to boil, skim off any foam that rises to the surface.   It is important to remove this foam as this is impurities and off flavors.   Reduce heat to a simmer for at least 4 hours and no more than 24 hours.    Cool and then strain into containers for refrigeration.   Freeze what you will not use in one week.


**and just a PS - I'm not 100% for sure that the heads I got from my fish monger were non-oily - which may account for the entire house smelling of fish. Either that, or it is because I have a very small house. Either way, the stock turned out wonderful.

Friday, March 4, 2011

Pastelli Candy


Candy on GAPS???? Yes!

This is a recipe from Nourished Kitchen. For the recipe go here.

I ended up adding a full tsp of salt, and used coconut ghee instead of olive oil. Chewy and sweet and so good!

Tuesday, March 1, 2011

Perfecting the Perfect Fried Egg

Eggs are a nutritional powerhouse. I completely pity those who are intolerant of eggs, as they are so incredibly versatile, delicious, convenient, and easy. Frying the perfect egg is not so easy. Sure, anyone can make scrambled eggs, even the perfect omelet isn't too hard, but frying without totally cooking the yolks and without flipping? Without burning? Without sticking to the pan and ruining your presentation? I assure you, it can be done!

Here are some tips to pull of a fried egg like a pro:

  • Lard. Lots of it! For the 8 in. skillet I picture, I use a full teaspoon. (And please, get it from a good source, and don't get hydrogenated. I care too much about your health!)

  • Good quality eggs. Better ingredients make for a better dish, or so we hear right? Eggs from chickens that are pastured, fed non-gmo feed, allowed to eat bugs and scrape the dirt, and allowed to run around will have richer, more nutrient dense yolks, better flavor, stronger whites, and harder shells. Organic does not equal quality product. Vegetarian does not include chickens - they are natural omnivores. "Cage-free" does not mean they get to run outside. Confusing? Yes. Buy the best eggs you can, you'll get your money's worth. 
  • Cast iron. Yes, those black pans your grandmother used. Believe me when I say they are the best! A well seasoned pan is naturally non-stick, easy to clean, and produces much better results than your non-stick aluminum skillet.  And with health benefits too. 

  • Fire! Some people are very attached to their electric stoves. I understand. I wouldn't mind a smooth surface to clean either. But for some things, fire allows a much higher degree of control and the quick change of temperature which spells the difference between an amazing dish and a flop. For frying eggs, a constant, low low temperature is what is necessary, so electric may work just fine, but I highly recommend gas. 
Now here's what to do. 
  • Put a low fire under your skillet. After a few times you'll know exactly how big the fire should be. My stove can go even lower than what I need for this (good for making stock!) but a very low fire is needed to cook these evenly. 
  • While pan is heating, add lard, swish it around until it is all melted and pan is coated. Be sure to go up the sides just a little. 
  • Crack eggs into pan before it has fully heated. The eggs should not sizzle when they hit the pan. If they do, that is ok, they will be a little crispy on the bottom.
  • I usually cook three small eggs at a time, but 2 large eggs will be about the same. 
  • As soon as eggs are in the pan, try to make the yolks more toward the center, if they don't go there with your finger, that is ok. 
  • Put lid on immediately. If you don't have a tempered glass lid, you'll just have to check on them more often. 
  • Let eggs sit. 
  • Once the white over the egg yolks is just starting to turn opaque, turn the pan off. Your eggs are done! 
  • Quickly, slide them out of the pan, onto a waiting plate. Assuming you used enough fat, you should be able to just slip them out by tipping the pan. 
  • Top with butter and salt and enjoy!

Friday, February 25, 2011

Quicky Brussels & Sausage

Another evening when meal prep didn't really happen, and I didn't get home until right before dinner time. And I needed to wake baby-cakes up. Nooo!

So I did what all hungry mothers do, I opened the fridge and let my daughter pull things out.

Brussels & Sausage

1/4 to 1/2 lb cooked sausage, crumbled
1 onion, chopped
1 half bulb garlic
1 lb brussells
2 cups chicken stock


Chop onions, add to hot cast iron skillet along with a couple heaping tablespoons of lard, or other fat. In-between stirring onions, chop garlic, and add when onions have cooked for a couple minutes. Cut off the ends of the brussels sprouts, after washing, and place, cut side down, on pan. (As pictured.) You may want to squish the onions out of the way a little bit so the brussels can brown. Cook for another couple minutes, then pour broth on top, and pile precooked sausage on top. Allow to simmer on high heat for about 10 minutes, until broth is reduce, and brussels are soft.

Meanwhile, set the table, throw scraps on the floor to keep baby happy, and pull out some parmesan cheese, if desired.

Once stock is reduced and the lovely greenery has changed colors and is very soft, run a knife through the brussels and mix everything up, and add another tablespoon (or two!) of fat. Salt if desired, and serve with a little cheese. Yum yum!

Monday, February 21, 2011

Lemon Salmon Stir-Fry


Hurray for quicky yummy meals!

Lemon Salmon Stir Fry

2 pieces salmon
3 ribs celery
2 large carrots (or more small ones)
2 onions
half bulb garlic
1 lemon
few shakes fish sauce
paprika
Dill
a couple tablespoons of lard

Chop all of your veggies while your pan is heating to medium-high. A wok is wonderful if you have it, but I just used my big cast iron skillet. Add some lard and stir-fry onions, then add carrots and garlic, then add celery. Keep the heat high and keep adding fat as needed. The veggies should be moving quickly around the pan to cook evenly. Once all are somewhat transparent (but still have a little bit of crunch,) set aside. 

If your fish was frozen, put in a bowl of warm (not hot!) water to defrost while everything else is cooking. Re-grease the pan, turn the heat to medium-low, and add the fish. Sprinkle with half of the lemon juice, several sprinkles paprika, and a little dill. Let the fish cook until just opaque. Salmon doesn’t like being overcooked. If you put a lid on, there should be no reason to flip. Mix rest of lemon and a couple swishes fish sauce to veggies, along with more fat as desired. Return veggies to pan if needed to warm, and serve over salmon. 

Saturday, February 19, 2011

Liverwurst Update!

I like my original liverwurst recipe a lot, but wanted to make some that was more sausage-y and less liver-y. When the opportunity arose to get real pastured pork for cheap, I was thrilled and tried this out.

Liver flavor is still there, but it is very subtle, and when tossed in other items (such as sasuage on pizza or in stew) it is not really noticeable at all!

4 lbs gr. pastured pork
2 lbs liver (maybe less)
1 onion, chopped finely and cooked.

6 tsp salt
4 tsp garlic powder - or 2 tsp finely chopped raw
4 tsp cumin
2 tsp cayenne (less for less spicey)
2 tsp ginger
other sausage spices, as desired. I threw in a tiny bit of sage. & pepper

put liver, onion, and spices in food processor. Add a little bit of pork to processor, then put everything in large bowl and mix thoroughly, shape into patties and fry in ungreased skillet.  - this recipe is very easily halved, I just made a huge batch.

Wednesday, February 9, 2011

What Does she eat?

My little girl is eating more and more food. We're still working on making sure digestion is in tip top shape, so I focus on the most digestible and nutrient dense foods I can. This is what a typical day looks like for my 18mo.

Breakfast:
-2 mostly raw egg yolks with lots of pastured butter.
I fry a couple eggs on low low heat until the whites are cooked, without flipping. That way there is a little yolk that is more cooked, but most of it is raw and just warmed, and all of the whites are cooked. You can eat raw egg white from what I understand, but I don't like the slimey texture, and I don't trust her gut yet enough to let her eat egg white.
-half-teaspon of fermented cod liver oil (Green Pastures bran)
-Some homemade 24hr yogurt if she is interested.

Lunch:
-a few tablespoons of mushed up vegetables that I'm eating, sometimes
-as much chicken, especially organ meats, as she wants to eat - maybe a 1/4 cup
-a few tablespoons homemade yogurt
as much homemade stock as she wants to eat
- several big spoonfuls of milk kefir. 

Dinner:
-1/8 c yogurt
and
-2-3 ice cube size pieces of a pureed soup
or
-pre-chewed meat that we are eating
-mushed up veggies we eating, sometimes
- several shreds of raw liver (I keep grated frozen liver in a container so I can just pull out a little and let it thaw while we're eating. She eats it like its dessert!)

I let her eat as she desires, when all of her food starts moving to the corner of her tray, then I know she'll only eat a few more bites that I feed her and be done. Some days she is all about yogurt, other days she like veggies, but I know I can trust her desires to keep everything balanced. When I remember, I give her sauerkraut at the beginning of the meal. She is still nursing a lot, but I let her drink water if she wants too.

For more information about feeding baby a Weston Price way, check out this article.

Happy foods for a happy baby!

Thursday, February 3, 2011

Goodies to read

The FAQ section on the GAPS website has been greatly expanded. Lots of good information there.

Life is a Palindrome has notes from a series of talks from Dr. NCM. Even more info.

Also - know someone with heart problems? Put Your Heart in Your Mouth is the book for them. Dr. NCM is also coming out with another GAPS book - Gut and Physiology. The original GAPS book has also been updated and expanded.


I wish you continued healing through diet!

Tuesday, February 1, 2011

Pink Vegetable Soup

 All little girls like pink, right? So all little girls will happily eat their vegetables when they are pink, right? I don't know if that is true, but my daughter did love this soup. And I was happy to get beets in her.


3 cups stock, additional filtered water to cover
3 large turnips
2 beets
1 bulb garlic
5-7 ribs celery
1 small butternut squash
3 small carrots
parsley - fresh or dried
2 onions

additional veggies as desired
salt to taste
1-2 tsp dried mustard
pepper

Chop all your veggies, dump everything in pot, and bring to a simmer. Simmer for about 20 minutes, or longer, until everything is soft.

I used turkey stock, which added a rich flavor, but you could use almost any stock. The sweeter veggies balance out the more bitter ones, and the beets make the whole soup pink!

Making Stock


I really like this mom's description of making stock. It is basically what I do.

Here are some additional notes about stock:

I have good jiggly stock in only 12-18 hours - depending on how diluted it is, whether I started with frozen bones or cooked chicken, whether it is first or second (or third?) batch... etc. I usually do try to go longer though. 24 hours is more ideal. The main thing is low low heat. A crock pot or a stock pot on top of cast iron pan will help have lower heat.

Cracking the bones helps release the marrow and minerals, any vinegar will help release minerals, and you don't need a huge amount. Just toss a little in with water and let it sit half hour or so before starting to heat. If it's already hot, and you don't have time to soak with acid, no big deal.

Once your tired of letting stock simmer, strain if desired, and drink/make soup, or save. Put in thick jars, and completely cool in fridge before freezing (if freezing) and freeze slightly tipped so you don't explode your jars. I have found that those nut jars or jars from my prepared-sauce days are thicker than mason jars, and freezing them tipped slightly makes a world of difference.

All the mushy bits and bones that completely disintegrate can be ground up (processor) as added bonus to thicken soups or use like bullion cubes. Organ meats I didn't/couldn't sneak into main course are easily hidden in this paté. You can even use it to make gravy!

Any kind of bones will work - however, certainly better raised animals will yield more nutrients and less toxins - esp. in regards to fats. Toxins are primarily stored in fat. You can bones for really cheap (or free!) if you find the right source. The best bones are the weird ones - knucke bones, heads, feets, legs, etc. Feet are especially good for gelatin.

You can get multiple batches of stock from the same set of bones, later batches will be much weaker. You will probably want to reduce the stock after making it.

Some people flavor the broth while they make it (with dried seasonings, trimmings from other veggies, onions, carrots, garlic, etc.) Salt should be added after finished simmering. I typically don't season my stock - I just season the dish I prepare with it.

And finally - stock is the best source of calcium and other minerals. Gelatin is incredibly healing, and stock is often referred to as the "elixir of life" - Whether you are just trying to be healthier or just save money - you WANT to add stock to your daily meals.
Related Posts with Thumbnails